
Frequently asked questions
-
What are my responsibilities/pre-placement requirements?
Students should refer to their student checklist for a comprehensive list of mandatory pre-placement conditional requirements.
-
How do I obtain a placement?
All clinical/field placements are arranged by the Course Coordinator and the CPU. Students are not to negotiate their own clinical placements. Please check with your Clinical Coordinator or contact the CPU.
-
When are my placements scheduled?
Students should refer to the teaching schedule provided at the time of their enrolment or re-enrolment for details of their clinical placement dates and times throughout the year. These dates and times are set in advance and are not negotiable.
Students are notified of placement details well in advance and are expected to be able to organise personal life commitments and travel arrangements to undertake these as scheduled.
-
Can I ask for a change to my placement allocation?
Variations to placement allocations are only considered in specific circumstances. Please refer to the Clinical Placement Policy (PDF 311KB) criteria for requesting a variation to your placement allocation. If you believe you have circumstances that may impact on your ability to attend certain placement locations, then you are strongly encouraged to submit a pre-allocation request to the CPU. This must be submitted, with supporting evidence, at least 12 weeks prior to the placement commencement date.
Student requests for variation to placement allocation must be submitted on the Variation to Placement form (PDF 141KB). The completed form and attachments must be lodged with the CPU within the specified time frame, following the initial notification of your placement allocation unless otherwise advised by the CPU. For details about how to submit/upload documents to the CPU, please refer to your student checklist.
Each request for variation to a placement will be considered by the Course Coordinator. A student may appeal a Course Coordinator's decision by making a written submission. Please contact the CPU for information if you wish to make an appeal. In the case of appeals for Nursing placements, please contact the Program Director ELA, should you wish to appeal the decision.
-
Can adjustments to my placement be made if I have an Access Plan?
Students with an Access Plan may need adjustments to their placement, depending on the requirements of the student. The Student Engagement Unit (SEU) recommends that a student with an Access Plan that has a placement requirement meets with their Program Director, Course Coordinator, and Access and Inclusion Advisor, as soon as practical to work through the adjustments that might be required, including if/how disclosure will be made to the host placement provider. This will ensure the best success at placement, and that the student’s needs are catered for in a structured, safe and supportive way.
Nursing and midwifery students are required to complete the Fitness to Practice in Clinical Placement documentation prior to placement. -
Can my placement dates change?
UniSA reserves the right to change clinical placement dates to suit clinical practice sites' availability if necessary. Students will be notified as soon as possible should such a circumstance eventuate.
-
What are my requirements on placement?
Students are strongly advised to read the Clinical Placement Policy (PDF 311KB) prior to placement.
All students must adhere strictly to the requirements around clinical placement practice for their program. The requirements are detailed in the Course Outline and other course documentation.
Students should also refer to the Practicum, Field and Clinical Placements clauses in the current year's Assessment Policies and Procedures Manual, for further information on their rights and responsibilities while on placement.
UniSA students are covered under the University of South Australia's insurance policy while on placement, provided that certain criteria are met.
-
Why can't I see my placement details when other students in my class have been allocated?
Only fully compliant students will have their placement allocation published to them. Sometimes, if there is additional checking that needs to be completed before a placement can published due to partial compliance, this will be noted in the verification comments against any compliance documents affected. The CPU is required to coordinate with your Course Coordinator & Placement Providers to ensure placement sites are able to support your placement with your current partial compliance.
-
Am I required to provide Conditional Evidence documents to my placement site?
Yes. Students must have copies of their conditional evidence documents available for sites to check on the first day of their placement. Documents can be accessed through students InPlace and PebblePad (nursing/midwifery students only).
-
What do I wear on placement?
Information on uniform policy can be found in policies and forms.
-
Will I be required to undertake a rural placement?
Some programs will require students to undertake a rural or interstate clinical placement. All nursing and midwifery students will be required to undertake a rural placement at least once during their program. Medical Radiation Science (all streams) students are also required to undertake a rural placement.
Further information can be found on the Rural Placements page.
-
My placement is across multiple sites, how should I get there?
You may be required to complete intra-placement site travel as part of your placement i.e. to secondary sites, community partners or home visits during your placement. Where possible, UniSA will ask its Industry Partners to provide access to vehicles where intra-placement travel is required. Students are also advised to provide information about their ability to drive on InPlace (if they have a car and if they are willing to drive), in order to assist in matching students to placement opportunities. Where a student uses their own car for intra-placement travel, the university will provide insurance for personal injury, but the student must have their own comprehensive insurance for damages. For further information about insurance coverage, please check the UniSA Insurance page for Personal Vehicle usage while on placement: https://i.unisa.edu.au/siteassets/staff/finance/forms/unisa-students-as-driver-and-passenger-in-vehicles-29112021.pdf Alternatively, students may be able to book UniSA pool vehicles via FM Assist https://i.unisa.edu.au/staff/facilities/fm-assist-services/transport/pool-vehicle-bookings/ however, this may not be a suitable option for everyday use while on placement.
-
What must I do if my placement provider asks me to complete Home Visits?
Where home visits are part of your placement, please check with your Course Coordinator first, as there may be additional requirements for you to complete to ensure your safety on placement, including risk assessment checklists and identifying hazards, work health and safety planning.
-
Are my mandatory compliance requirements the same for interstate placements?
Students who will be undertaking an interstate placement may require additional compliance documents before their placements can be confirmed. Each state also has its own requirements, which it is the student’s responsibility to meet. You can find out more about interstate requirements here.
-
What do I need to know about N95 Mask Fit Testing?
Most students will need to be fit tested prior to placement.
- CPU will contact you via email to let you know when you need to book a fit test appointment (6-8 weeks before placement)
- It is your responsibility to book and attend your fit test appointment prior to placement (after being notified)
- You are required to complete a consent form online before the appointment
- There is no cost for UniSA students for fit testing at UniSA clinics
- UniSA provides the fit test service but will not supply masks. Placement sites will supply masks where necessary.
- Students may be turned away from placement by the Agency if they cannot provide evidence of their Fit Test results.
Please note: UniSA’s Fit Test Clinic does not accept any appointments for students who do not have an upcoming placement.
If students receive a reminder to be fit tested and evidence has been uploaded to InPlace - you do not need to book another appointment.
-
What is the Commonwealth Prac Payment (CPP)?
In May 2024 the Australian Government announced the establishment of the Commonwealth Prac Payment.
The CPP, available from 1 July 2025, will be available to eligible students studying teaching, nursing, midwifery, and social work programs to help them manage the costs associated with undertaking a mandatory placement. The CPP will be means tested and valued at up to $319.50 per week while eligible students are undertaking their placement.
Further information about the CPP is available on the Department of Education web page here.
Information about how to apply for the CPP at UniSA will be available in the next few weeks on the Campus Central FAQs Page.
https://askcampuscentral.unisa.edu.au/app/answers/detail/a_id/4180
InPlace help
-
How do I access InPlace?
Open Mozilla Firefox or Google Chrome and type in the following InPlace web address: https:\\unisa-prod.inplace.com.au. Please note that InPlace is not optimised for Internet Explorer.
-
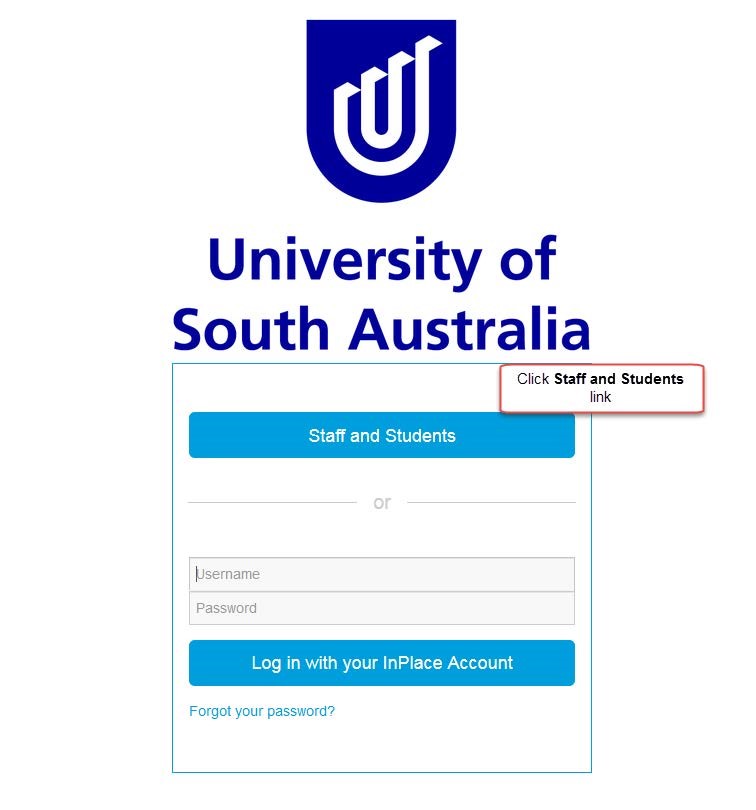
How do I log in to InPlace?
- Open InPlace using either Mozilla Firefox or Google Chrome
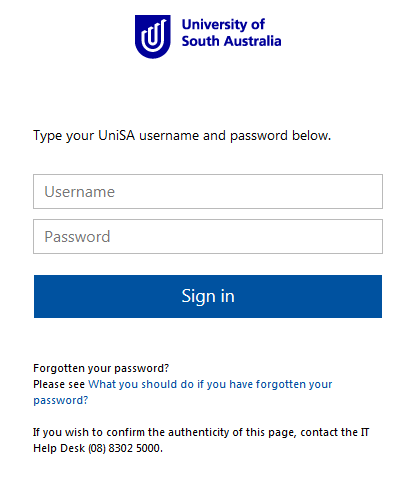
- Click on Staff and Students and you will be directed to the log in screen
- Enter your UniSA student username and password
- When you log into InPlace for the first time you will need to accept the terms and conditions in order to use the system.
-
I have forgotten my password, what should I do?
For information about password security and resetting your password please visit the Ask IT website.
-
How do I submit my preferences?
- Once logged in, you will be directed to your ‘Home’ page.
- Navigate to the ‘To Do’ widget, this will display a notification that preferencing is open and it will prompt you to submit your preferences.
- Click the Agency Preferences link or
 icon to submit your preference, you will be directed to the ‘Agency Preference’ page.
- Under your Placement Block Name, you will see the number of preference choices you are required to submit.
- Use the scroll bar to navigate through the list of available agencies or search using the filter function.
- To select an agency, click the
 icon, this will change your selection to
  indicating that you have preferenced an agency.
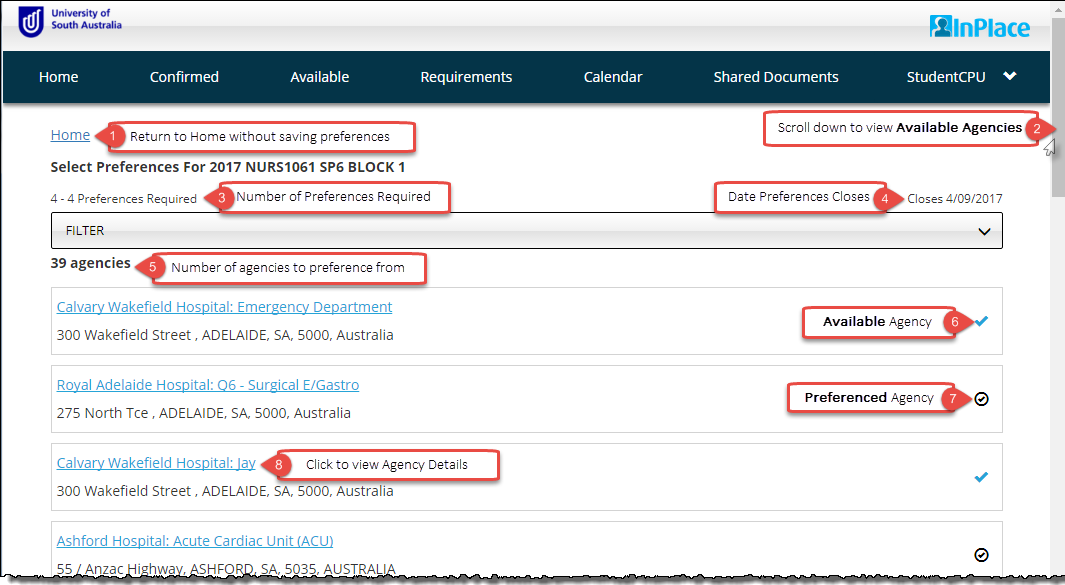
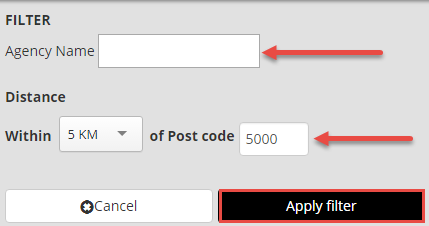
- You can use the filter tool to make searching for available agencies easier.
- Once you are happy with your selected agencies, and have reached the maximum number of preferences click the “NEXT> Rank preferences” button to order your preferences.

- If you do not reach the maximum number of preferences, you will be unable to click the “NEXT> Rank preferences” button to order your preferences.

- Click the “NEXT> Rank preferences” button to navigate to “Order of Preference” page.
- Use the
 icon to drag your preferences into your chosen order.
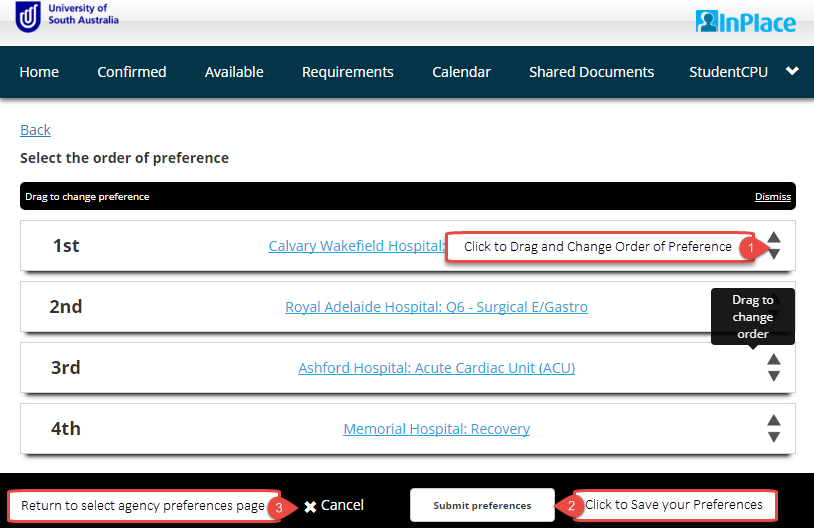
- Once you have finalised your preference selection, click the ‘Submit preferences’ button, the pop-up below will display at the top of the screen when you have successfully saved your preferences.

- Once logged in, you will be directed to your ‘Home’ page.
-
How do I change my preferences?
During the preferencing period you can still log in to make changes. Once the preference period closes, you will no longer be able to view your agency preferences. If you want to keep a record of the preferences you submitted - take a screenshot or write them down.
- Login to InPlace and return to the ‘Home’ page.
- Navigate to the ‘To Do’ widget, this will now display an
 icon rather than an
  icon to denote that preferences have been submitted.
 - Click the Agency Preferences link or
 icon to resubmit your preference.

-
I have highly extenuating circumstances, how can I request special consideration?
- Submitting a pre-allocation request (PDF 723KB)
- If you believe that your request complies with Section 5 (i) of the Clinical Placement Policy, please complete a pre-allocation request form and attach supporting documentation, as a single file, at least 12 weeks prior to the commencement of your placement.
- Special consideration requests will only be considered in the following circumstances:
- Students with an Access Plan
- Students who are the registered Carer for a sick or disabled dependent child or relative, with documented evidence
- Students with a major health problem requiring frequent and specialised treatment, which is only available at certain locations, with documented evidence
- Other highly extenuating medical, compassionate, or special circumstances such as those outlined in Clause 7 of the Assessment Policies and Procedures Manual.
- Log in to InPlace. Click the my details
 icon, to navigate to the ‘student details’ page.
 - Scroll down to navigate to the optional information sections.
- Click the
 icon to open the drop-down menu.
- Ensure that you click and download the Pre-Allocation Request form from the link provided.

- Complete your application form and include any supporting documentation, by saving as one file, and upload to InPlace.
- Enter today’s date and add any comments, if applicable.
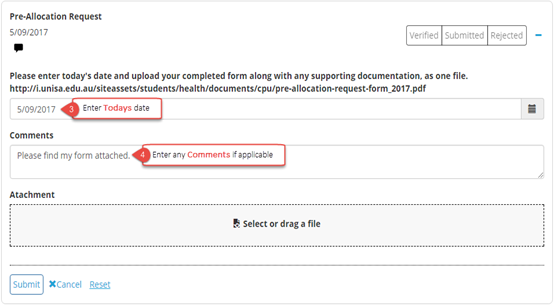
Or click the “Select or drag a file” button to locate your file to be uploaded.
You can also drag your file from your desktop directly into InPlace.
- The file name will be listed underneath Select or drag a file” section when it is has been uploaded.
- Click the “X” button if you want to remove the document and upload an alternative file.
- Click the “Submit” button to complete the requirement, the following pop-up will alert you if you have been successful and will return you to the My Details page.

- The verified bar will be automatically set to blue and ‘Submitted’ until it is verified by clinical placement unit (CPU) administrative staff. Please allow two business days for your document to be verified.

- You will know your file has uploaded successfully when a paperclip icon
 displays. Clicking the
  icon will download your document.
- The verified bar will be automatically set to blue and ‘Submitted’ until it is verified by clinical placement unit (CPU) administrative staff. Please allow two business days for your document to be verified.
-
How do I submit a variation to placement request on InPlace?
- Once logged in, you will be directed to your home page.
- Click your username, on the top right hand side, to open the menu
- Click the My Details
 icon, this will also navigate you to the ‘Student Details’ page.
 - Scroll down to navigate to the ‘Optional Information Requests’ section to submit a Pre-Allocation Request.
- Click the
 icon to open the drop-down menu
-
Complete and save the form and supporting evidence as one file to your desktop and then continue to upload as outlined below. *Note file upload size should not exceed 5MB.
Supporting evidence documentation can include medical certificates, proof of being a primary carer, and other medical documents. Importantly, you should aim to provide supporting documentation that will support your application. - Click the Choose file button. Ensure you click the Upload button and that you see the file listed before pressing save.
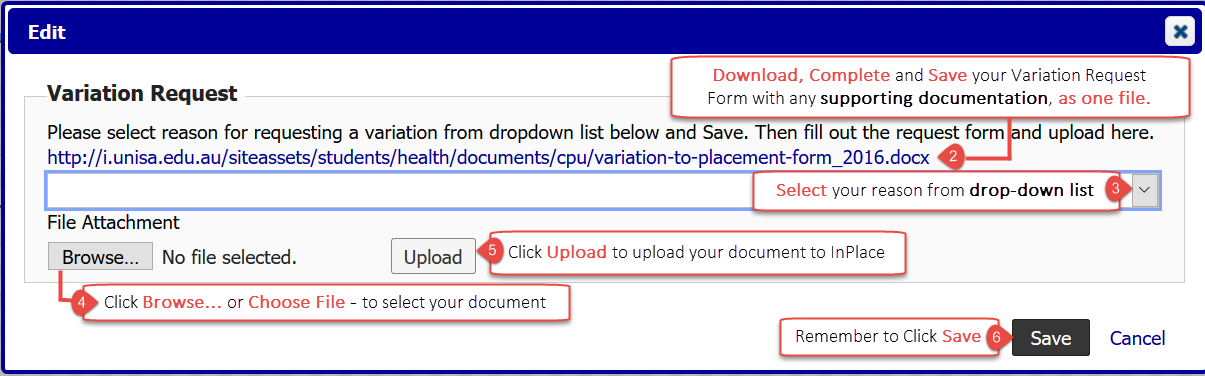
- Once the document has been successfully uploaded, you will see the file name next to the upload button (yellow highlight below). Additionally, a paperclip icon will appear near to the edit button.

-
How do I submit conditional evidence on InPlace?
Submitting conditional evidence (PDF 745KB)
- Once logged in, you will be directed to your Home page.
- The ‘To Do’ widget will outline if there are outstanding conditional evidence documents to be uploaded.
- Clicking the Information required link or
 icon will direct you to the ‘My Details’ page.
 - You can also access student details by selecting the icon next to your username at the top right of the menu.

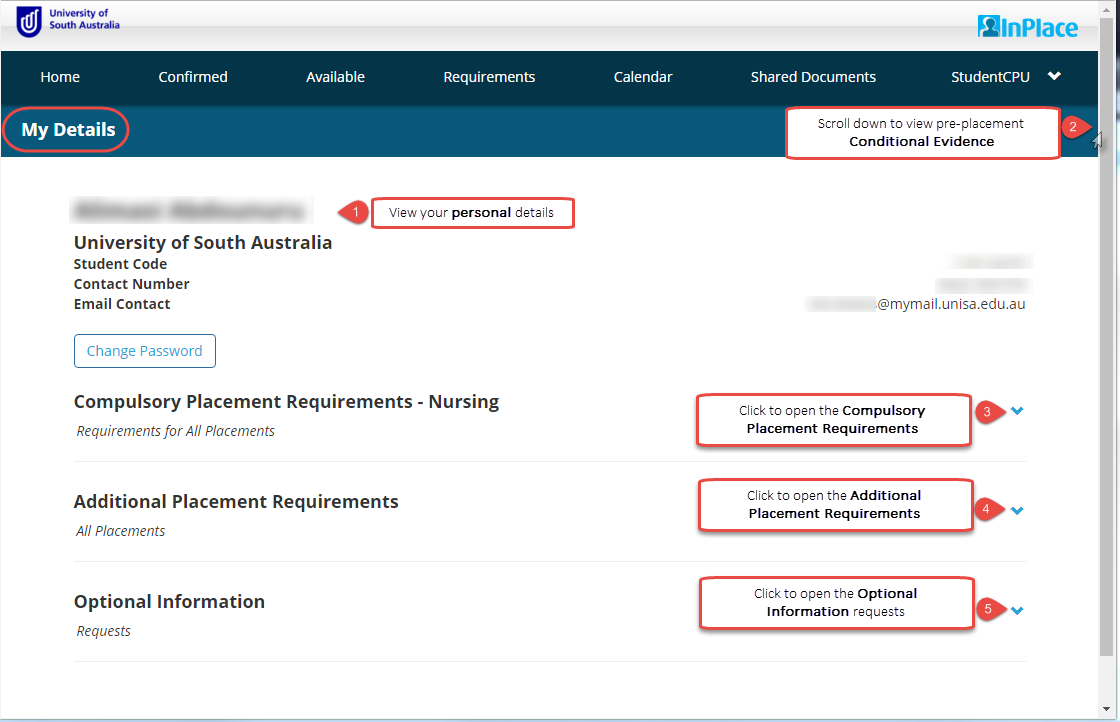
- Scroll down to navigate to the Compulsory Placement Requirements,Additional Placement Requirements, or Optional Information sections.
- Click the icon to open the Requirement view.
*Note file upload size should not exceed 5MB.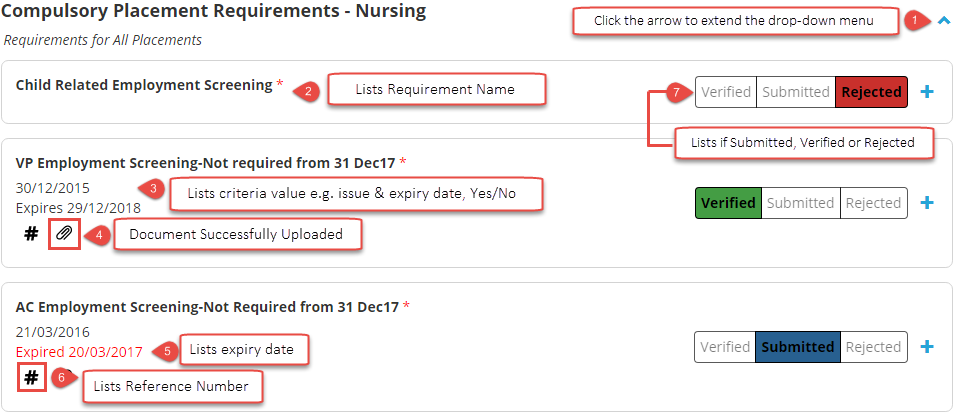
- Click the
 icon, to open the window allowing you to view the requirements for that item.
- Ensure that you accurately complete the required criteria based on your current certificates using the steps below.
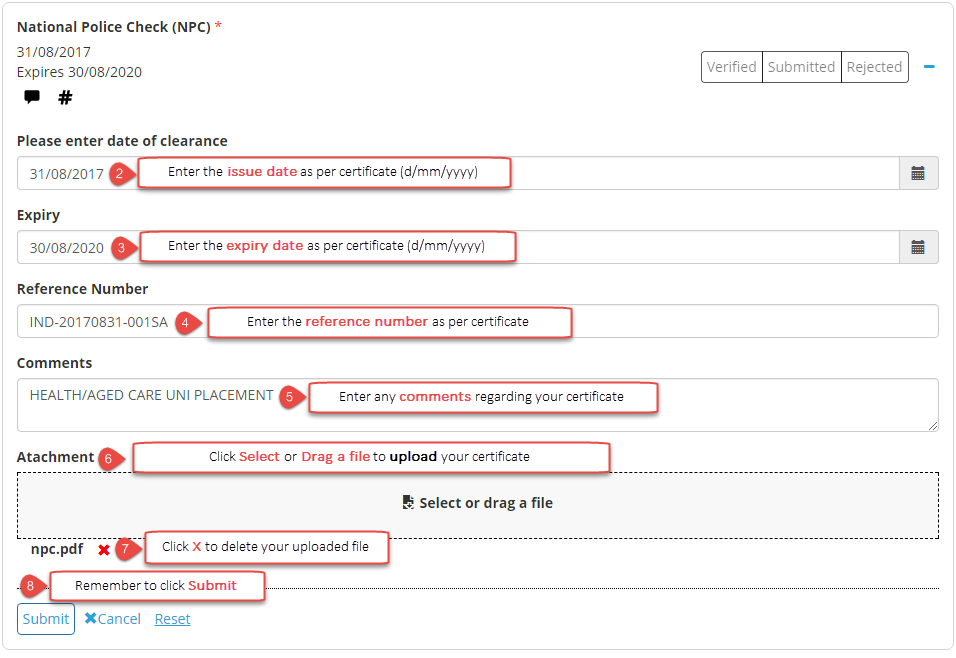
- Click the “Submit” button to complete the requirement, the following pop-up will alert you if you have been successful and return to the My Details page.

- The verified bar will be automatically set to blue and ‘Submitted’ until it is verified by Clinical Placement Unit (CPU) administrative staff. Please allow two business days for your documents to be verified.

- You will know that your file has uploaded successfully as a paperclip icon
 displays. Clicking the icon will download your document. If you experience issues uploading your file, it could be that your document is too large; that is, it exceeds 5MB. Reduce the size of your file and try again.
 - Some conditional evidence requirements; for i.e. Medical Calculations are read-only. This means that you cannot upload a document or make changes to a requirement.
- Once verified, the status bar will turn Green and ‘Verified’, or Red and ‘Rejected’ if not accepted.
- You will know that your file has uploaded successfully as a paperclip icon
Once you upload compulsory conditional evidence, it will need to be verified by the CPU. InPlace automatically notifies the CPU of your upload. Please allow two business days for your documents to be verified.
It is your responsibility to ensure your documents are verified and have not been rejected. Please read the Verification Comments section on the home screen, which will display if your document has been rejected.
-
My verification status says no, what does that mean?
Understanding the conditional evidence verification process
Once you upload compulsory conditional evidence, it will need to be verified by the CPU. InPlace automatically notifies the CPU of your upload. Please allow two business days for your documents to be verified.
It is your responsibility to ensure your documents are verified and have not been rejected. Please read the Verification Comments section on the home screen, which will display if your document has been rejected.
Initial Upload
The initial upload of a document will appear as blue status bar. InPlace will automatically set the status to ‘Submitted’ meaning the document is awaiting verification by the CPU Office.

Approved Upload
If your document is approved the verified status bar will be set to ‘Verified’ and turn green. The student requires no further action.

Rejected Upload
If your document has not met the requirement standards, or you have failed to attach the appropriate documentation, the verified status bar will be set to ‘Rejected’ and turn red.
You are required to note and action the CPU comment ‘Verification Comments’ provided in the home screen.
There are certain circumstances in which a ‘rejected’ status is not a barrier to placement. It is important to read the verification comments and if you have any questions contact the CPU office.

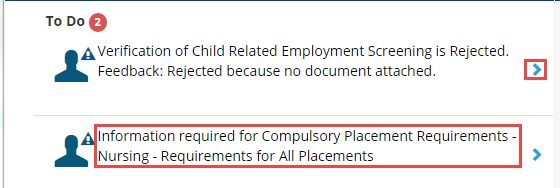
Home Screen – To Do – Verification Rejected
Once you log into InPlace the ‘To Do’ widget will alert students when their upload does not meet the appropriate requirement. You are required to action the ‘Verification Feedback’ provided by the CPU.

Home Screen – To Do – Placement Requirements Required
Once you log into InPlace the ‘To Do’ widget will alert students that there are outstanding placement requirements that require action.

-
How do I view my allocated placement?
Viewing your placement allocation guide (PDF 1051kb)
Viewing your placement allocation
- Once logged in, you will be directed to your InPlace ‘Home’ page.
- If you have met all of your pre-placement conditions you will see your upcoming placement confirmed on your home page.
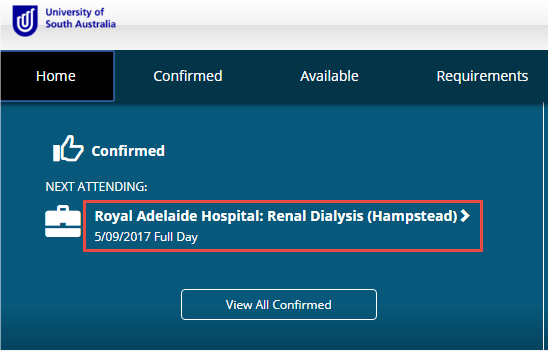
- To view all your placements, click the ‘view All Confirmed’ button, to display details of your confirmed upcoming placement.

- Alternatively, click the ‘Confirmed’ tab from the menu and locate the status ‘current’.
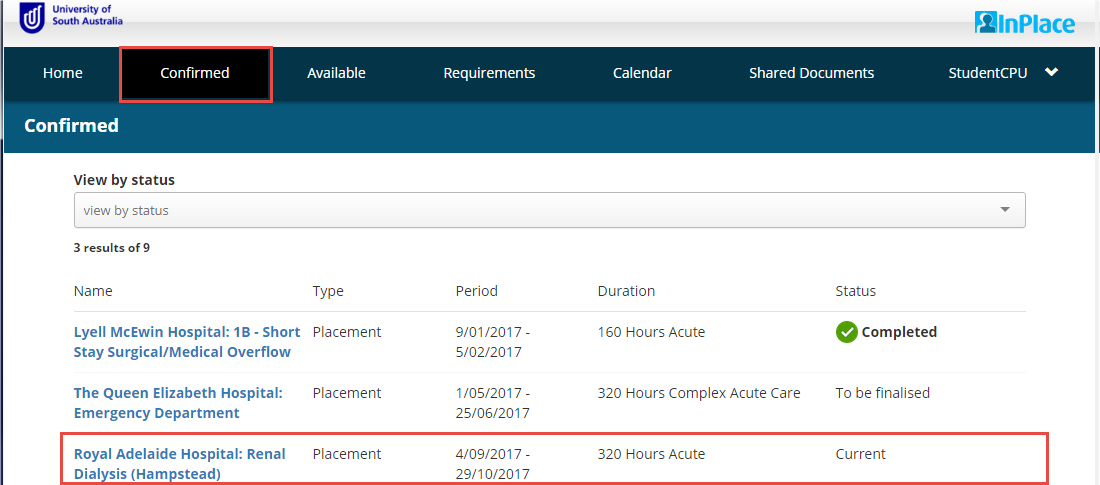
Note: If you have not met all of your pre-placement conditional evidence requirements, you will not be able to view your allocated placement site.
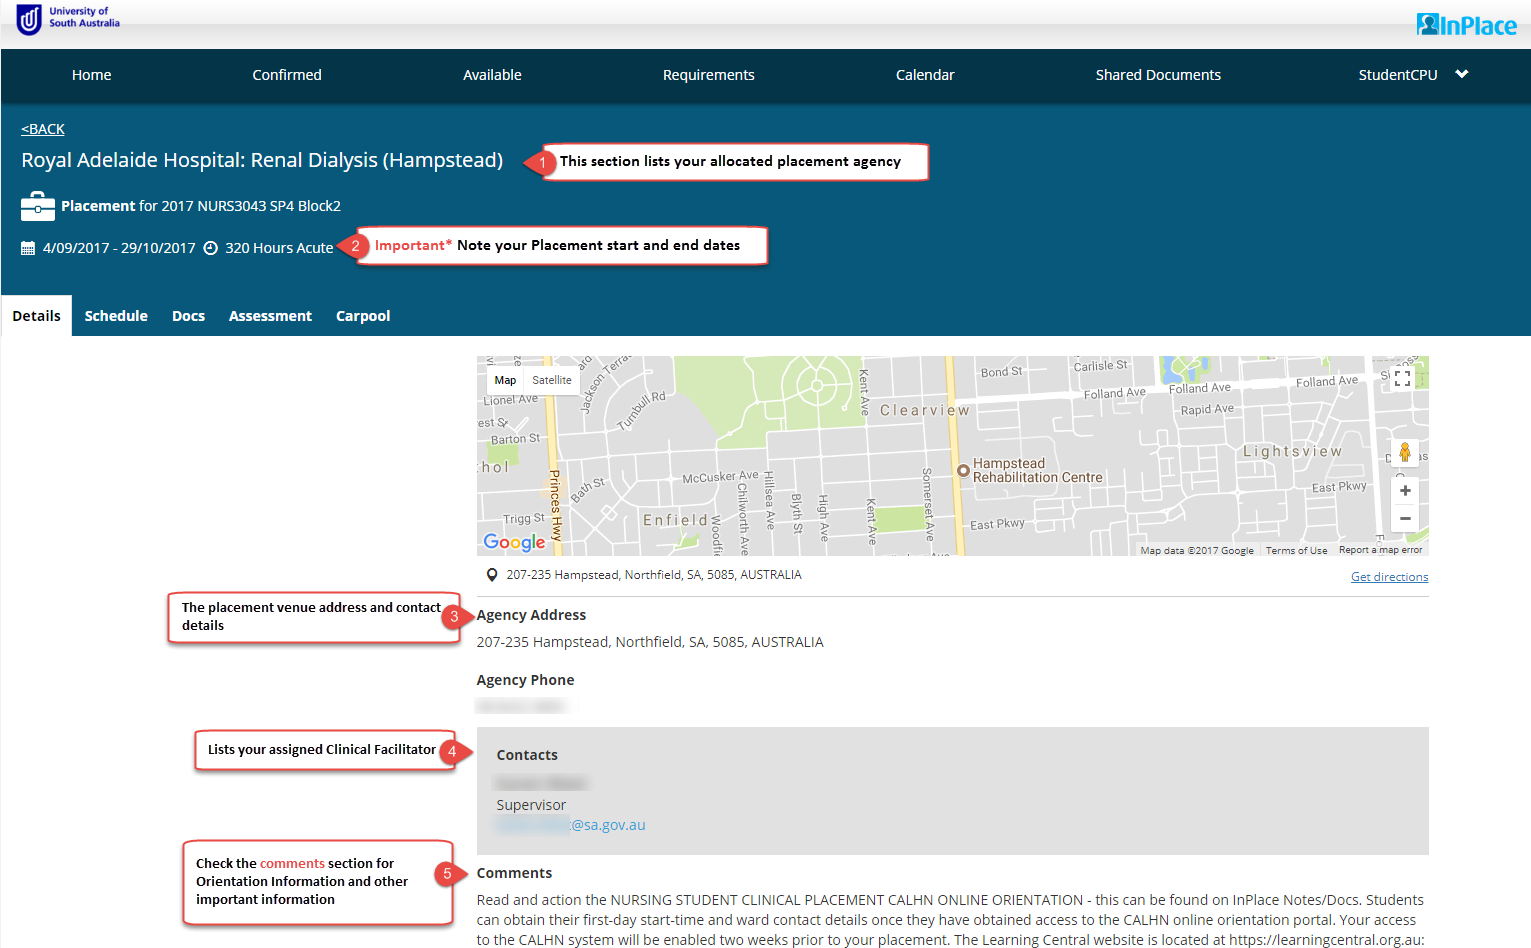
Viewing your Clinical Facilitator details
On your confirmed placement page, there is a greyed out area that will display your Supervisor details. This area will be updated with supervisor information when a Clinical Facilitator/Supervisor has been assigned to you. Please check this area two weeks prior to your placement start-date to obtain this information.

Viewing shared documents - pre-placement venue requirements
Please check the ‘Shared Documents’ tab to access venue specific documents or additional requirements that you may need to be meet prior to your placement. First day orientation details may also be stored here. To view shared documents follow the steps below and ensure that you are proactive about completing additional pre-placement requirements, where applicable. Student conditional evidence documents can also be accessed from this area.
Note: Not all venues have shared documents.
- To action specific Pre-Placement venue documentation, select the ‘Shared Documents’ tab.
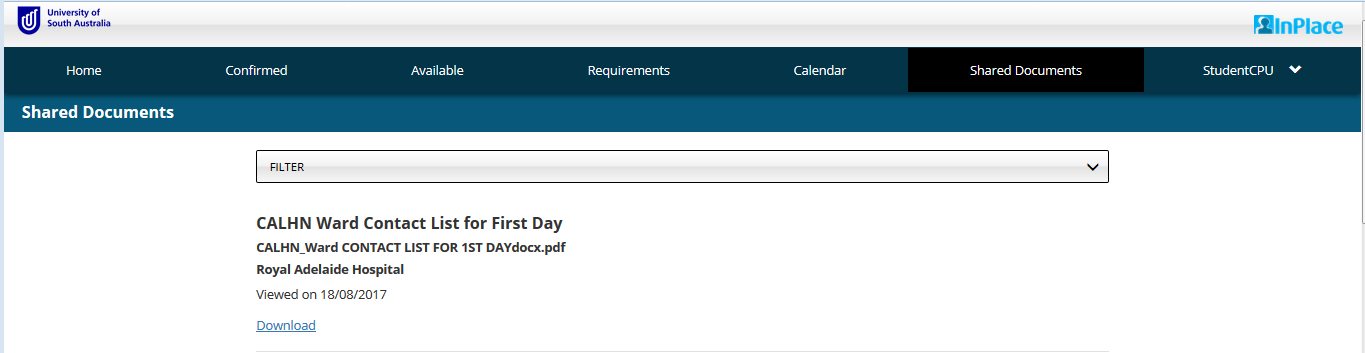
- Click the Download linkto read and action each of the shared (agency) documents.
Note: Students that do not complete pre-placement venue requirements, may have their placement cancelled by the venue.
-
Why can I not see my placement allocation?
If you have not met your conditional evidence requirements for placement, you will not be able to view your allocated placement. Please upload your conditional evidence to InPlace (login required) and allow 3 - 5 working days for CPU staff to verify and update the status.
-
How do I view my orientation information?
Viewing your placement allocation guide (PDF 1051kb)
If your venue has specified first day orientation details, follow the steps below:
- Log into InPlace, and on the homepage navigate to the ‘Upcoming Placements’ section, this will display details of confirmed upcoming placement.
- Click the ‘Detail’ link – (do not click the agency name link) to navigate to the ‘Placement’ page
- Scroll down to the ‘Comment’ section.

-
How do I view my pre-placement venue documentation?
Viewing your placement allocation guide (PDF 1051KB)
If your venue has specified additional requirements that you will need to meet prior to placement and first day orientation details, follow the steps below
- Log into InPlace, and on the homepage navigate to the ‘Upcoming Placements’ section, this will display details of confirmed upcoming placement.
- Click the ‘Detail’ link – (do not click the agency name link) to navigate to the ‘Placement’ page
- Click on the Agency (placement location) facility name link to open the Agency page. Do not click the ward link.

- Click the [View] button to view any additional information

- Click the Notes/Docs tab and action any required documents.

-
What is the ‘Student Document Repository’?
The Student Document Repository is a record of all shared documents that have been recorded on InPlace against your account.
To acknowledge you have uploaded a document click the ‘View’ link to download the document. InPlace will automatically record a date (Access Date) and the notification count on the student document repository tab will be reduced.

-
How long does it take for my conditional evidence to be verified?
Please allow up to five to seven business days for your conditional evidence documents to be verified and updated by CPU staff. After this time we recommend that students login to InPlace to ensure that documents have been recorded correctly, verified, and set to yes. If your document has been rejected, read the comment entered by CPU staff and follow the instructions provided.
Contact the CPU
To contact the Clinical Placement Unit, email cpuoffice@unisa.edu.au or call (08) 8302 2214
Office Hours are 08:30 - 4.30pm Monday to Friday.